Java API를 사용하여 숨겨진 파일을 포함하여 디렉터리에 있는 모든 파일을 재귀적으로 가져오는 방법을 정리했다.
Java directory file list를 얻어오기 위해서 사용하는 몇가지 API는 다음과 같다.
- Files.list()
- Files.walk()
- DirectorySystem
- File.listFiles()
- File.listFiles(filter)
- Stream.filter()
테스트를 위한 샘플 디렉토리 구조는 다음과 같다.
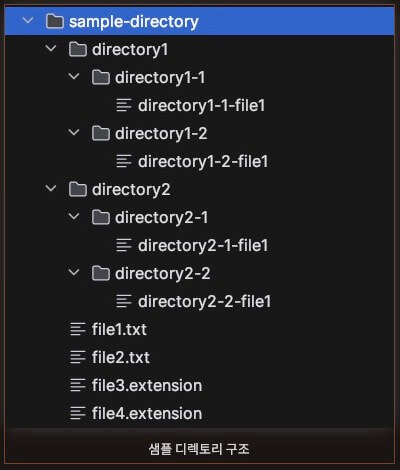
참고로 sample-directory의 절대경로는 /java-project/blog/filelist/sample-directory이다.
Directory의 파일만 리스팅
Files.list()를 이용한 파일 목록 스트리밍
하위 디렉터리와 하위 디렉토리 파일을 제외한 해당 디렉터리의 파일 목록만 가져올 때 사용한다.
//samplePath의 Path 타입이고 경로는 /java-project/blog/filelist/sample-directory/ 이다.
@Test
void files_list_test() throws IOException {
    try (Stream<Path> pathStream = Files.list(samplePath)) {
        List<File> list =
            pathStream
                .map(Path::toFile)
                .filter(File::isFile)
                .toList();
        list.forEach(System.out::println);
    }
}/java-project/blog/filelist/sample-directory/file2.txt
/java-project/blog/filelist/sample-directory/file1.txt
/java-project/blog/filelist/sample-directory/file4.extension
/java-project/blog/filelist/sample-directory/file3.extensionDirectoryStream을 이용한 파일 목록
DirectoryStream은 looping을 사용하여 디렉터리의 항목을 반복하는 데 사용된다.
DirectoryStream을 닫으면 스트림과 관련된 모든 리소스가 해제된다.
스트림을 닫지 않으면 resource leak이 발생할 수 있으므로 try-with-resources 구문을 사용하는 것이 좋다.
@Test
void directory_stream_test() {
    List<File> fileList = new ArrayList<>();
    try (DirectoryStream<Path> stream = Files.newDirectoryStream(samplePath)){
        stream.forEach(path -> {
            if (!Files.isDirectory(path)) {
                fileList.add(path.toFile());
            }
        });
    } catch (IOException e) {
        System.out.println("IOException " + e.getMessage());
    }

    fileList.forEach(System.out::println);
}/java-project/blog/filelist/sample-directory/file2.txt
/java-project/blog/filelist/sample-directory/file1.txt
/java-project/blog/filelist/sample-directory/file4.extension
/java-project/blog/filelist/sample-directory/file3.extensionDirectory의 하위 디렉터리를 포함한 파일 리스팅
Files.walk()를 이용한 파일목록 스트리밍
Files.walk() 메서드는 지정된 시작 디렉터리에서 시작하여 디렉토리 depth를 순회한 결과에 대한 stream을 반환한다.
@Test
void files_walk_test() {
    List<Path> pathList = new ArrayList<>();
    try (Stream<Path> pathStream = Files.walk(samplePath)) {
        pathList = pathStream.map(Path::normalize)
            .filter(Files::isRegularFile)
            .toList();
    } catch (IOException e) {
        System.out.println("IOException " + e.getMessage());
    }

    pathList.forEach(System.out::println);
}/java-project/blog/filelist/sample-directory/file2.txt
/java-project/blog/filelist/sample-directory/file1.txt
/java-project/blog/filelist/sample-directory/directory2/directory2-2/directory2-2-file1
/java-project/blog/filelist/sample-directory/directory2/directory2-1/directory2-1-file1
/java-project/blog/filelist/sample-directory/file4.extension
/java-project/blog/filelist/sample-directory/file3.extension
/java-project/blog/filelist/sample-directory/directory1/directory1-2/directory1-2-file1
/java-project/blog/filelist/sample-directory/directory1/directory1-1/directory1-1-file1하위 디렉터리의 파일을 포함한 목록을 출력하였다.
하위 디렉터리를 포함하려면 filter(Files::isRegularFile)을 제거하면 된다.
파일 목록이 아닌 디렉토리 목록만 출력하기 위해서는 filter(Files::isDirectory)로 수정하면 된다.
@Test
void files_walk_test() {
    List<Path> pathList = new ArrayList<>();
    try (Stream<Path> pathStream = Files.walk(samplePath)) {
        pathList = pathStream.map(Path::normalize)
            .filter(Files::isDirectory)
            .toList();
    } catch (IOException e) {
        System.out.println("IOException " + e.getMessage());
    }

    pathList.forEach(System.out::println);
}/java-project/blog/filelist/sample-directory
/java-project/blog/filelist/sample-directory/directory2
/java-project/blog/filelist/sample-directory/directory2/directory2-2
/java-project/blog/filelist/sample-directory/directory2/directory2-1
/java-project/blog/filelist/sample-directory/directory1
/java-project/blog/filelist/sample-directory/directory1/directory1-2
/java-project/blog/filelist/sample-directory/directory1/directory1-1Recursion을 사용한 파일 목록
File.isDirectory()와 File.listFiles()를 이용하여 재귀적으로 파일 목록을 가져올 수 있다.
@Test
void recursion_test() {
    List<File> files = listFiles(samplePath.toString());
    files.forEach(System.out::println);
}

private List<File> listFiles(String path) {
    List<File> fileList = new ArrayList<>();
    File[] files = new File(path).listFiles();
    for (File file : files) {
        if (file.isDirectory()) {
            fileList.addAll(listFiles(file.getPath()));
        } else {
            fileList.add(file);
        }
    }

    return fileList;
}/java-project/blog/filelist/sample-directory/file2.txt
/java-project/blog/filelist/sample-directory/file1.txt
/java-project/blog/filelist/sample-directory/directory2/directory2-2/directory2-2-file1
/java-project/blog/filelist/sample-directory/directory2/directory2-1/directory2-1-file1
/java-project/blog/filelist/sample-directory/file4.extension
/java-project/blog/filelist/sample-directory/file3.extension
/java-project/blog/filelist/sample-directory/directory1/directory1-2/directory1-2-file1
/java-project/blog/filelist/sample-directory/directory1/directory1-1/directory1-1-file1File 객체의 listFiles() 메서드의 경우 FileFilter 혹은 FilenameFilter를 인자로 전달하여 특정 조건의 파일 목록을 가져올 수 있다. FileFilter는 Predicate 유형의 함수형 인터페이스로써 다음과 같다.
@FunctionalInterface
public interface FileFilter {

    /**
     * Tests whether or not the specified abstract pathname should be
     * included in a pathname list.
     *
     * @param  pathname  The abstract pathname to be tested
     * @return  {@code true} if and only if {@code pathname}
     *          should be included
     */
    boolean accept(File pathname);
}FilenameFilter 도 지원하는데 역시 BiPredicate 유형의 함수형 인터페이스로써 다음과 같다.
@FunctionalInterface
public interface FilenameFilter {
    /**
     * Tests if a specified file should be included in a file list.
     *
     * @param   dir    the directory in which the file was found.
     * @param   name   the name of the file.
     * @return  {@code true} if and only if the name should be
     * included in the file list; {@code false} otherwise.
     */
    boolean accept(File dir, String name);
}FileFilter와 FilenameFilter를 사용하여 특정 파일만 가져오거나 특정 확장자를 가진 파일만 가져오는 테스트 코드다.
@Test
void recursion_test() {
    //파일 목록에서 확장자가 .txt 인 파일 목록만 추출
    FilenameFilter filenameFilter =
        (file, name) -> name.endsWith(".txt");

    //FileFilter를 대체하여 사용 가능하다.
    //물론 listFiles의 2번째 파라미터 타입은 FileFilter로 변경해야 한다.
    //FileFilter filter = file -> file.getName().endsWith(".txt");

    List<File> files = listFiles(samplePath.toString(), filenameFilter);
    files.forEach(System.out::println);
}

private List<File> listFiles(String path, FilenameFilter filter) {
    List<File> fileList = new ArrayList<>();
    File[] files = new File(path).listFiles(filter);
    for (File file : files) {
        if (file.isDirectory()) {
            fileList.addAll(listFiles(file.getPath(), filter));
        } else {
            fileList.add(file);
        }
    }

    return fileList;
}/java-project/blog/filelist/sample-directory/file2.txt
/java-project/blog/filelist/sample-directory/file1.txt특정 확장자의 파일 목록을 가져오는 것은 Stream 방식을 사용하는 경우에도 filter를 통해서 다음과 같이 사용 가능하다.
@Test
void files_walk_extension_test() {
    List<Path> pathList = new ArrayList<>();
    try (Stream<Path> pathStream = Files.walk(samplePath)) {
        pathList = pathStream.map(Path::normalize)
            .filter(Files::isRegularFile)
            .filter(file -> file.getFileName().toString().endsWith(".extension"))
            .toList();
    } catch (IOException e) {
        System.out.println("IOException " + e.getMessage());
    }

    pathList.forEach(System.out::println);
}/java-project/blog/filelist/sample-directory/file4.extension
/java-project/blog/filelist/sample-directory/file3.extension병렬 처리
만약 전체 대상 파일 목록이 상당히 많고 각 파일에 대한 CPU 연산 작업이 필요한 경우(ex. 파일 해시)에는 병렬 처리를 하는 것이 성능상 유리하다. 물론 파일 개수가 몇개 되지 않는 경우 (50개 이하 정도? 그 수치는 정확히 측정하지는 않았다.)는 그냥 sync하게 처리하는 것이 더 나을 수도 있다.
하지만 파일 개수가 몇 백개 이상 단위이고 각 파일에 대한 CPU 연산이 필요한 경우는 병렬적인 처리가 성능적으로 확실히 유리하다.
Files.walk를 통해 얻은 Stream을 parallel() 호출로 병렬 처리를 할 수도 있지만 parallel()은 내부적으로 고정된 크기의 global ForkJoinPool을 사용하므로 만약 애플리케이션 코드에서 parallel()을 사용하는 부분이 있다면 병목이 발생할 수 있다. 그냥 깔끔하게 직접 스레드풀을 만들어서 CPU 작업이 필요한 곳에서 사용하는 것이 가장 깔끔할 것 같다.
다음 코드는 전체 파일 목록을 가져와서 각 파일에 대한 SHA256 해시를 병렬로 얻도록 한다.
private static void parallel(Path rootPath)
        throws IOException, ExecutionException, InterruptedException {

    ExecutorService executorService =
               Executors.newFixedThreadPool(Runtime.getRuntime().availableProcessors());

    List<Future<String>> pathList;
    try (Stream<Path> pathStream = Files.walk(rootPath)) {
        pathList = pathStream.map( Path::normalize )
                .filter(Files::isRegularFile)
                .map( path -> executorService.submit( () -> calcSHA256( path ) ))
                .toList();
    }

    for (Future<String> future : pathList) {
        System.out.println(future.get());
    }

    executorService.shutdown();
}또는 다음과 같이 CompletubleFuture를 활용하는 것도 좋은 방법이다.
private static void parallel( Path rootPath )
        throws IOException, ExecutionException, InterruptedException {

    ExecutorService executorService =
               Executors.newFixedThreadPool( Runtime.getRuntime().availableProcessors() );

    List<CompletableFuture<String>> futureList;
    try ( Stream<Path> pathStream = Files.walk( rootPath ) ) {
        futureList = pathStream.map( Path::normalize )
                .filter( Files::isRegularFile )
                .map( path ->
                        CompletableFuture.supplyAsync( () -> {
                                    try {
                                        return calcSHA256( path );
                                    }
                                    catch ( IOException | NoSuchAlgorithmException e ) {
                                        throw new RuntimeException( e );
                                    }
                                }, executorService )
                                .thenApply( hash -> {
                                    System.out.println( hash );
                                    return hash;
                                } ) )
                .toList();
    }

    futureList.forEach( CompletableFuture::join );
    System.out.println("total size: " + futureList.size());

    executorService.shutdown();
}
다음 코드는 전체 파일 목록을 가져와서 각 파일에 대한 SHA256 해시를 순차적으로 얻도록 한다.
private static void sync(Path rootPath) throws IOException {
    List<String> pathList;
    try (Stream<Path> pathStream = Files.walk(rootPath)) {
        pathList = pathStream.map( Path::normalize )
                .filter(Files::isRegularFile)
                .map( path -> {
                    try {
                        return calcSHA256( path );
                    }
                    catch ( IOException | NoSuchAlgorithmException e ) {
                        throw new RuntimeException( e );
                    }
                } )
                .toList();
    }

    for(String path : pathList){
        System.out.println(path);
    }
}다음 코드는 지정된 경로의 파일에 대해서 SHA256 해시를 리턴하는 코드다.
private static String calcSHA256(Path path) throws IOException, NoSuchAlgorithmException {
    MessageDigest messageDigest = MessageDigest.getInstance("SHA-256");
    try( InputStream inputStream = Files.newInputStream(path) ) {
        byte[] buffer = new byte[4096];
        int read;
        while ((read = inputStream.read(buffer)) != -1) {
            messageDigest.update(buffer, 0, read);
        }
    }

    return bytesToHex(messageDigest.digest());
}

private static String bytesToHex(byte[] bytes) {
    StringBuilder sb = new StringBuilder( bytes.length * 2 );
    for ( byte b : bytes ) {
        sb.append(String.format("%02x", b));
    }

    return sb.toString();
}2642개의 일반 파일이 있는 디렉토리에 대해서 수행 시간을 비교해 보자.
find . -type f | wc -l
2642
public static void main( String[] args ) throws IOException {
    Path root = Path.of("/workspace/java-project/blog");
    long parallelTime = measure( path -> {
        try {
            parallel(path);
        }
        catch ( IOException | ExecutionException | InterruptedException e ) {
            throw new RuntimeException( e );
        }
    }, root );

    long syncTime = measure( path -> {
        try {
            sync(path);
        }
        catch ( IOException e ) {
            throw new RuntimeException( e );
        }
    }, root);

    System.out.println("parallel elapsed time: " + parallelTime);
    System.out.println("sync elapsed time: " + syncTime);
}

private static long measure( Consumer<Path> pathConsumer, Path path ) throws IOException {
    long start = System.nanoTime();
    pathConsumer.accept(path);
    long end = System.nanoTime();
    return TimeUnit.NANOSECONDS.toMillis(end - start);
}결과는
parallel elapsed time: 419
sync elapsed time: 775단위는 ms (millisecond)다. 약 360ms 정도 차이지만 확실히 병렬로 수행한 것이 더 빠르다. 360ms가 적은 차이라고 할 수도 있겠지만 컴퓨터 세상에서는 상당히 큰 차이라고 볼 수 있다. 또한 파일 개수가 많으면 많을 수록 그 차이는 더 커질 것이다.
물론 파일 개수가 10개 정도 있는 경우에는 sync로 처리한 것이 더 빠르다. 파일 개수가 적은 경우에는 병렬 처리를 위한 컨텍스트 스위치 비용이나 스레드풀의 작업 큐 관리 비용 같은 것이 불필요 하지만 소모되기 때문이지 않을까 싶다.
끝.