
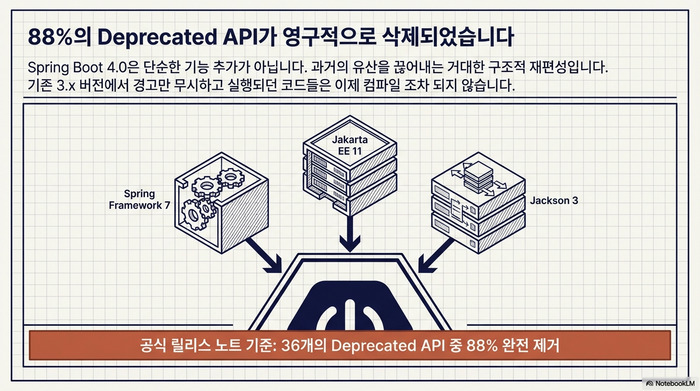
이번 포스팅에서는 Spring Boot 4.0 마이그레이션에 대해서 정리하고자 한다. Spring Boot 4.0은 Spring Framework 7, Jakarta EE 11, Jackson 3이라는 세 가지 메이저 버전 업그레이드를 한꺼번에 품고 있다. 3.x에서 deprecated 경고만 무시하고 달려왔다면, 4.0에서는 해당 API가 전부 삭제되었기 때문에 컴파일조차 되지 않을 수 있다. 공식 릴리스 노트 기준으로 36개의 deprecated 클래스 중 88%가 제거되었다. 이 글에서는 실제 프로젝트에서 Spring Boot 4.0 마이그레이션을 진행할 때 부딪히는 핵심 변경사항을 코드 레벨에서 살펴보고, 안전하게 전환하는 순서를 정리한다.
올리기 전에 반드시 3.5.x를 거쳐라
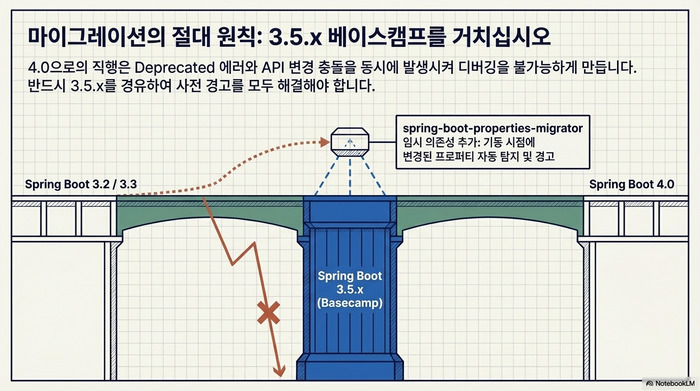
Spring Boot 4.0 마이그레이션의 첫 번째 원칙은 최신 3.5.x로 먼저 올리는 것이다. 4.0에서 삭제된 API는 대부분 3.x 시절에 deprecated 처리된 것들이다. 3.5.x에서 deprecated 경고를 전부 잡아낸 뒤 4.0으로 올리면 컴파일 에러를 대폭 줄일 수 있다.
<!-- pom.xml: 3.5.x 최신 버전으로 먼저 올린다 -->
<parent>
    <groupId>org.springframework.boot</groupId>
    <artifactId>spring-boot-starter-parent</artifactId>
    <version>3.5.5</version>
</parent>위 설정으로 먼저 3.5.5까지 올린 다음, IDE에서 deprecated 경고를 전부 확인하고 수정한다. 이 과정을 건너뛰고 바로 4.0으로 올리면 deprecated 제거와 API 변경이 동시에 터져서 디버깅 난이도가 급격히 올라간다.
4.0으로 올릴 때는 spring-boot-properties-migrator를 임시로 추가하면 변경된 설정 프로퍼티를 자동으로 탐지해 준다.
<!-- 마이그레이션 기간 동안만 추가, 완료 후 제거 -->
<dependency>
    <groupId>org.springframework.boot</groupId>
    <artifactId>spring-boot-properties-migrator</artifactId>
    <scope>runtime</scope>
</dependency>이 의존성은 애플리케이션 기동 시점에 변경된 프로퍼티 이름을 감지하고 콘솔에 경고 메시지를 출력한다. 마이그레이션이 완료되면 반드시 제거해야 한다. 프로덕션 환경에서는 불필요한 오버헤드를 유발하기 때문이다.
Jackson 3 전환이 가장 큰 벽이다
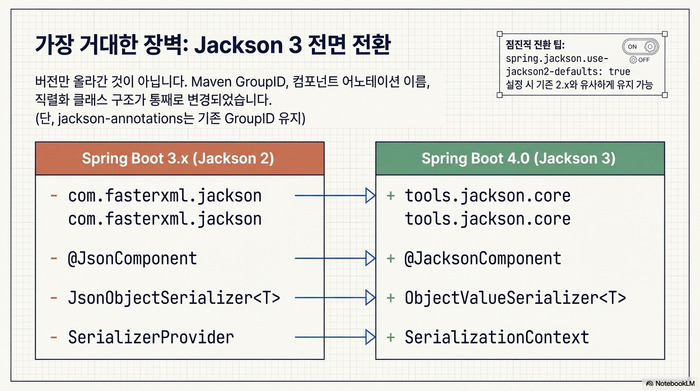
Spring Boot 4.0 마이그레이션에서 가장 많은 코드 변경을 요구하는 부분이 Jackson 2에서 3으로의 전환이다. 단순히 버전만 올리는 수준이 아니라, Maven groupId부터 클래스 이름, 예외 계층 구조까지 전면 변경되었다.
groupId와 클래스 이름 변경
<!-- Jackson 2 (Spring Boot 3.x) -->
<dependency>
    <groupId>com.fasterxml.jackson.core</groupId>
    <artifactId>jackson-databind</artifactId>
</dependency>

<!-- Jackson 3 (Spring Boot 4.0) -->
<dependency>
    <groupId>tools.jackson.core</groupId>
    <artifactId>jackson-databind</artifactId>
</dependency>groupId가 com.fasterxml.jackson에서 tools.jackson.core로 바뀌었다. 단, jackson-annotations 모듈만은 예외적으로 기존 com.fasterxml.jackson.core groupId를 유지한다. 직접 Jackson 의존성을 선언해서 쓰고 있다면 이 부분을 수정해야 한다.
어노테이션과 컴포넌트 이름도 바뀌었다.
// Spring Boot 3.x (Jackson 2)
@JsonComponent
public class MoneySerializer extends JsonObjectSerializer<Money> {
    @Override
    protected void serializeObject(Money value, JsonGenerator gen,
                                   SerializerProvider provider) {
        // 직렬화 로직
    }
}

// Spring Boot 4.0 (Jackson 3)
@JacksonComponent  // @JsonComponent → @JacksonComponent로 변경
public class MoneySerializer extends ObjectValueSerializer<Money> {
    // JsonObjectSerializer → ObjectValueSerializer로 변경
    @Override
    protected void serializeObject(Money value, JsonGenerator gen,
                                   SerializationContext context) {
        // SerializerProvider → SerializationContext로 변경
    }
}핵심은 두 가지다. @JsonComponent가 @JacksonComponent로, JsonObjectSerializer가 ObjectValueSerializer로 이름이 바뀌었다. 역직렬화 쪽도 JsonObjectDeserializer가 ObjectValueDeserializer로 바뀌었다. Jackson2ObjectMapperBuilderCustomizer 역시 JsonMapperBuilderCustomizer로 이름이 달라졌으니, 커스텀 ObjectMapper 설정이 있다면 같이 수정해야 한다.
예외 계층 구조 변경 — catch 블록을 전부 점검하라

// Spring Boot 3.x — Jackson 2에서는 IOException을 상속
try {
    objectMapper.readValue(json, MyDto.class);
} catch (IOException e) {
    // Jackson 2의 JsonProcessingException은 IOException 하위
    log.error("JSON 파싱 실패", e);
}

// Spring Boot 4.0 — Jackson 3에서는 RuntimeException을 상속
try {
    objectMapper.readValue(json, MyDto.class);
} catch (JacksonException e) {
    // Jackson 3의 JacksonException은 RuntimeException 하위
    // IOException으로는 잡히지 않는다
    log.error("JSON 파싱 실패", e);
}이 변경은 조용히 버그를 만들 수 있어서 각별히 주의해야 한다. Jackson 2에서 JsonProcessingException은 IOException을 상속했지만, Jackson 3에서 JacksonException은 RuntimeException을 상속한다. 기존에 catch (IOException e)로 Jackson 예외를 잡고 있었다면, 4.0에서는 해당 catch 블록을 그냥 통과해 버린다. 프로젝트 전체에서 catch (IOException을 검색하여 Jackson 관련 코드가 포함되어 있는지 반드시 확인해야 한다.
호환성 옵션으로 점진적 전환
Jackson 3의 기본 동작이 부담스럽다면 호환성 플래그를 활용할 수 있다.
# application.yml — Jackson 2 호환 모드
spring:
  jackson:
use-jackson2-defaults: true # Jackson 2 기본값과 최대한 동일하게 동작이 옵션을 true로 설정하면 Jackson 3이 Jackson 2의 기본 동작과 최대한 유사하게 작동한다. 대표적으로 Locale 직렬화 방식이 다른데, Jackson 2는 zh_CN 형식을 쓰지만 Jackson 3은 zh-CN(LanguageTag 형식)을 사용한다. 이런 차이가 API 응답에 영향을 줄 수 있으므로, 점진적으로 전환할 때 유용한 옵션이다.
Starter 이름이 통째로 바뀌었다
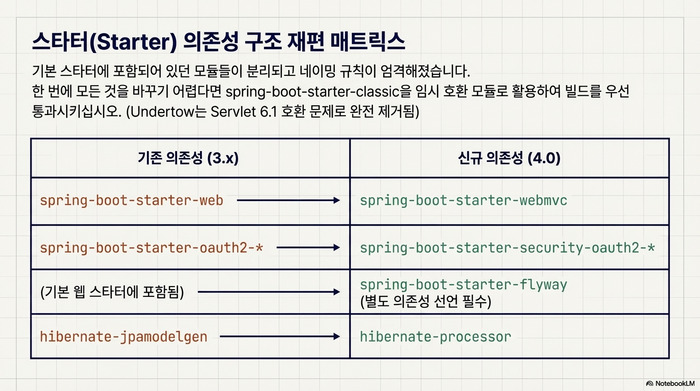
pom.xml이나 build.gradle을 가장 많이 고치게 되는 원인이 Starter 구조 재편이다.
// build.gradle — Spring Boot 3.x
dependencies {
    implementation 'org.springframework.boot:spring-boot-starter-web'
    implementation 'org.springframework.boot:spring-boot-starter-oauth2-resource-server'
    // Flyway는 spring-boot-starter에 포함
}

// build.gradle — Spring Boot 4.0
dependencies {
    implementation 'org.springframework.boot:spring-boot-starter-webmvc'  // web → webmvc
    implementation 'org.springframework.boot:spring-boot-starter-security-oauth2-resource-server'  // security- 접두사 추가
    implementation 'org.springframework.boot:spring-boot-starter-flyway'  // 별도 스타터 필요
}눈에 띄는 변경이 세 가지다. spring-boot-starter-web이 spring-boot-starter-webmvc로 바뀌었고(WebFlux는 기존대로 spring-boot-starter-webflux 사용), OAuth 관련 스타터에 security- 접두사가 붙었다. Spring Security JWT 인증을 구현한 프로젝트라면 스타터 이름을 함께 점검해야 한다. Flyway와 Liquibase도 더 이상 기본 스타터에 포함되지 않아 별도로 선언해야 한다.
Undertow 지원도 완전히 사라졌다. Servlet 6.1과 호환이 안 되기 때문이다. Undertow 기반 배포를 하고 있었다면 Tomcat이나 Jetty로 갈아타야 한다. Docker 환경에서의 배포 전략은 Spring Boot Docker 배포 가이드를 참고하면 된다.
Spring Session도 전용 스타터가 분리되었다. 기존에는 spring-boot-starter-data-redis와 spring-session-data-redis를 조합해서 사용했지만, 4.0에서는 세션 전용 스타터가 따로 생겼다.
// Spring Boot 3.x — Redis 기반 세션 저장
dependencies {
    implementation 'org.springframework.boot:spring-boot-starter-data-redis'
    implementation 'org.springframework.session:spring-session-data-redis'
}

// Spring Boot 4.0 — 세션 전용 스타터로 통합
dependencies {
    implementation 'org.springframework.boot:spring-boot-starter-session-data-redis'
}spring-boot-starter-session-data-redis 하나로 Redis 기반 세션 관리에 필요한 의존성이 모두 포함된다. 프로퍼티 경로도 spring.session.redis.*에서 spring.session.data.redis.*로 달라졌으니 함께 수정해야 한다.
빠르게 전환하고 싶다면 spring-boot-starter-classic을 임시로 사용할 수 있다.
<!-- 빠른 마이그레이션용 Classic 스타터 -->
<dependency>
    <groupId>org.springframework.boot</groupId>
    <artifactId>spring-boot-starter-classic</artifactId>
</dependency>
<dependency>
    <groupId>org.springframework.boot</groupId>
    <artifactId>spring-boot-starter-test-classic</artifactId>
    <scope>test</scope>
</dependency>Classic 스타터는 기존 3.x 스타일의 의존성 구조를 유지해 주는 임시 호환 모듈이다. 먼저 Classic으로 컴파일을 통과시킨 뒤, 이후 개별 기술 스타터로 하나씩 교체하는 전략이 실무에서 안전하다.
설정 프로퍼티 이름이 달라졌다
application.yml이나 application.properties도 손봐야 한다. 주요 변경 목록을 정리한다.
# Spring Boot 3.x
spring:
  data:
    mongodb:
      host: localhost
      port: 27017
  session:
    redis:
      namespace: myapp
management:
  tracing:
    enabled: true

# Spring Boot 4.0
spring:
  mongodb:                     # spring.data.mongodb → spring.mongodb (Data 무관 설정)
    host: localhost
    port: 27017
  session:
    data:
      redis:                   # spring.session.redis → spring.session.data.redis
        namespace: myapp
  persistence:
    exceptiontranslation:
      enabled: true            # spring.dao.exceptiontranslation → spring.persistence.exceptiontranslation
management:
  tracing:
    export:
enabled: true # management.tracing.enabled → management.tracing.export.enabledMongoDB, Session, Tracing 등 여러 영역에서 프로퍼티 경로가 달라졌다. spring-boot-properties-migrator를 추가해 두면 기동 시점에 대체 경로를 알려 주니 하나씩 잡아나가면 된다. MongoDB를 쓰고 있다면 spring.data.mongodb.representation.uuid와 spring.data.mongodb.representation.big-decimal 값을 명시적으로 설정해 줘야 한다.
테스트 코드에서 바꿔야 할 것들
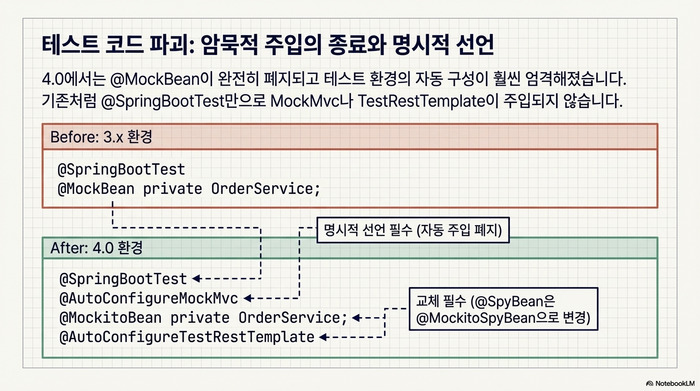
테스트 코드 쪽 변경도 만만치 않다. 가장 대표적인 것이 @MockBean의 폐지다.
// Spring Boot 3.x
import org.springframework.boot.test.mock.mockito.MockBean;
import org.springframework.boot.test.mock.mockito.SpyBean;

@SpringBootTest
@AutoConfigureMockMvc  // 4.0에서는 이 어노테이션이 반드시 필요
class OrderControllerTest {

    @MockBean  // 3.x에서 deprecated, 4.0에서 제거
    private OrderService orderService;

    @Autowired
    private MockMvc mockMvc;
}

// Spring Boot 4.0
import org.springframework.test.context.bean.override.mockito.MockitoBean;

@SpringBootTest
@AutoConfigureMockMvc  // @SpringBootTest만으로는 MockMvc가 주입되지 않는다
class OrderControllerTest {

    @MockitoBean  // @MockBean → @MockitoBean으로 변경
    private OrderService orderService;

    @Autowired
    private MockMvc mockMvc;
}두 가지가 동시에 바뀌었다. @MockBean이 @MockitoBean으로 이름이 달라졌고, @SpringBootTest만으로는 MockMvc 빈이 자동 구성되지 않는다. @AutoConfigureMockMvc를 직접 달아 줘야 한다. @SpyBean은 @MockitoSpyBean으로 바뀌었다.
TestRestTemplate도 자동 주입 방식이 바뀌었다.
// Spring Boot 4.0 — TestRestTemplate 사용 시
@SpringBootTest(webEnvironment = SpringBootTest.WebEnvironment.RANDOM_PORT)
@AutoConfigureTestRestTemplate  // 명시적 선언 필요
class IntegrationTest {

    @Autowired
    private TestRestTemplate restTemplate;  // 패키지도 변경됨
    // org.springframework.boot.resttestclient.TestRestTemplate
}@SpringBootTest가 더 이상 TestRestTemplate을 자동 주입하지 않으므로 @AutoConfigureTestRestTemplate을 추가해야 한다. 새로 도입된 RestTestClient를 쓰려면 @AutoConfigureRestTestClient를 사용한다.
Hibernate 7과 데이터 계층 변경
Hibernate 관련 의존성 이름도 바뀌었다.
<!-- Spring Boot 3.x -->
<dependency>
    <groupId>org.hibernate.orm</groupId>
    <artifactId>hibernate-jpamodelgen</artifactId>
</dependency>

<!-- Spring Boot 4.0 -->
<dependency>
    <groupId>org.hibernate.orm</groupId>
    <artifactId>hibernate-processor</artifactId>  <!-- jpamodelgen → processor -->
</dependency>hibernate-jpamodelgen이 hibernate-processor로 이름이 바뀌었다. JPA 메타모델 생성기를 쓰고 있다면 의존성 이름을 수정해야 빌드가 통과한다.
Spring Batch 쪽은 변화가 더 크다. 4.0부터 Spring Batch의 기본 저장소가 데이터베이스가 아닌 인메모리로 바뀌었다.
# Spring Boot 4.0 — 기존처럼 DB에 배치 메타데이터를 저장하려면
# spring-boot-starter-batch가 아닌 spring-boot-starter-batch-jdbc를 사용<!-- DB 기반 배치 메타데이터 저장이 필요한 경우 -->
<dependency>
<groupId>org.springframework.boot</groupId>
<artifactId>spring-boot-starter-batch-jdbc</artifactId>
</dependency>spring-boot-starter-batch만 달고 DB 메타데이터 저장을 당연시하던 경우, 4.0으로 올리면 배치 작업 이력이 통째로 사라질 수 있다. spring-boot-starter-batch-jdbc로 바꿔야 기존 동작이 유지된다.
그 밖에 놓치기 쉬운 Spring Boot 4.0 마이그레이션 포인트
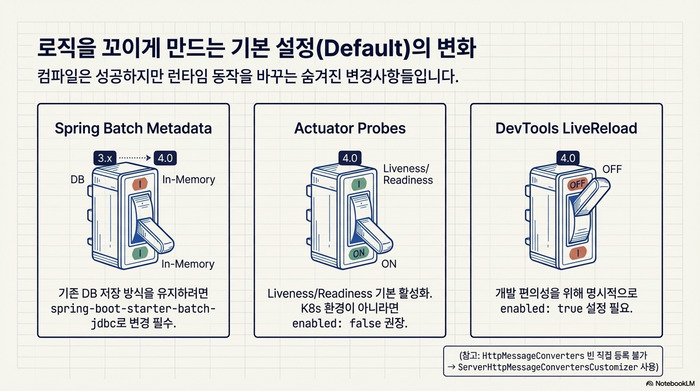
Actuator Liveness/Readiness 프로브 기본 활성화
# 4.0부터 liveness, readiness 프로브가 기본 활성화
# Kubernetes가 아닌 환경에서 불필요하면 비활성화
management:
  endpoint:
    health:
      probes:
enabled: false4.0부터 Liveness와 Readiness 프로브가 기본으로 활성화된다. Kubernetes 환경이라면 별도 설정 없이 바로 사용할 수 있어 편리하지만, 일반 VM 배포 환경에서는 health 엔드포인트에 불필요한 그룹이 노출될 수 있으므로 확인이 필요하다.
DevTools Live Reload 기본 비활성화
# 4.0에서 Live Reload가 기본 비활성화로 변경
spring:
  devtools:
    livereload:
enabled: true # 필요하면 명시적으로 활성화개발 환경에서 브라우저 자동 새로고침을 사용하던 팀이라면 이 설정을 추가해야 한다.
HttpMessageConverters 대체
// Spring Boot 3.x — HttpMessageConverter 빈 직접 등록
@Bean
public HttpMessageConverters customConverters() {
    return new HttpMessageConverters(new CustomXmlConverter());
}

// Spring Boot 4.0 — Customizer 패턴으로 변경
@Bean
public ServerHttpMessageConvertersCustomizer customConverters() {
    return converters -> converters.addConverter(new CustomXmlConverter());
}HttpMessageConverters를 직접 빈으로 등록하는 방식이 deprecated되었다. 서버 측은 ServerHttpMessageConvertersCustomizer, 클라이언트 측은 ClientHttpMessageConvertersCustomizer 인터페이스를 구현하는 방식으로 대체한다.
실전 마이그레이션 순서 요약
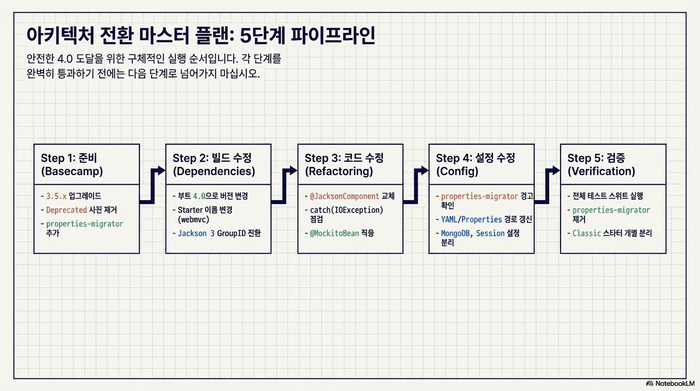
Spring Boot 4.0 마이그레이션은 다음 순서로 진행하는 것이 안전하다.
1단계: 준비
- Spring Boot 3.5.x 최신 버전으로 먼저 업그레이드
- deprecated 경고 전부 제거
spring-boot-properties-migrator의존성 추가
2단계: 빌드 파일 수정
spring-boot-starter-parent버전을 4.0.x로 변경- Starter 이름 변경 적용 (web → webmvc, OAuth 접두사 등)
- Jackson 3 groupId 변경 (직접 선언한 경우)
- Flyway/Liquibase 별도 스타터 추가
3단계: 소스 코드 수정
@JsonComponent→@JacksonComponent변경catch (IOException)블록에서 Jackson 관련 코드 점검@MockBean→@MockitoBean교체@SpringBootTest에@AutoConfigureMockMvc추가- 패키지 import 경로 업데이트
4단계: 설정 파일 수정
spring-boot-properties-migrator경고 기반으로 프로퍼티 이름 수정- MongoDB, Session, Tracing 등 프로퍼티 경로 변경
5단계: 검증 및 정리
- 전체 테스트 스위트 실행
spring-boot-properties-migrator의존성 제거- Classic 스타터 사용 시 개별 기술 스타터로 교체
Spring Boot 4.0 마이그레이션은 한 번에 모든 것을 바꾸려 하기보다, Classic 스타터로 먼저 컴파일을 통과시킨 뒤 점진적으로 정리하는 것이 실무에서 검증된 전략이다. 4.0에서 새로 추가된 API Versioning 기능도 확인해 볼 만하다. 공식 Spring Boot 4.0 Release Notes와 Migration Guide를 참고하면 여기서 다루지 못한 세부 변경사항도 확인할 수 있다. Moderne의 자동화 마이그레이션 도구를 사용하면 대규모 프로젝트에서 반복적인 코드 변경을 자동화할 수 있으므로 함께 검토해 볼 만하다.
지금까지 Spring Boot 4.0 마이그레이션에 대해서 정리해 보았다. Jackson 3 전환과 Starter 구조 재편이 가장 큰 변경이고, 테스트 어노테이션과 설정 프로퍼티 이름 변경도 꼼꼼히 확인해야 한다. 3.5.x를 경유하고, properties-migrator를 활용하고, Classic 스타터로 단계적으로 접근하면 4.0 전환을 안전하게 마칠 수 있다.