SpringApplication 인스턴스가 생성된 후 인스턴스의 run() 호출시(정적 메서드 run()이 아니다) Application Bootstraping을 위한 13단계를 거치는데 어떤 과정들을 수행하는지 알아보자. SpringApplication 클래스 코드는 Spring Boot 3.2.1 버전을 사용하였다.
먼저 보면 좋은 포스팅
Spring Boot 시작 – SpringApplication 생성과 자동 감지
Application Bootstraping 과정의 13단계
Spring Boot 애플리케이션의 시작 과정은 다음과 같은 13개의 주요 단계로 구성된다.
우선 SpringApplication의 run() 메서드(정적 메서드 아님)는 다음과 같다.
public ConfigurableApplicationContext run(String... args) {
    // startup 객체 생성
    Startup startup = Startup.create();
    // shutdown 훅 설정
    if (this.registerShutdownHook) {
       SpringApplication.shutdownHook.enableShutdownHookAddition();
    }
    // BootstrapContext 생성
    DefaultBootstrapContext bootstrapContext = createBootstrapContext();
    // headless 모드 설정
    ConfigurableApplicationContext context = null;
    configureHeadlessProperty();
    // 시작 과정을 모니터링하기 위한 리스너를 가져온다.
    SpringApplicationRunListeners listeners = getRunListeners(args);
    listeners.starting(bootstrapContext, this.mainApplicationClass);
    try {
       // 명령행 인수를 처리하고 환경 객체를 준비한다.
       ApplicationArguments applicationArguments = new DefaultApplicationArguments(args);
       ConfigurableEnvironment environment =
                    prepareEnvironment(listeners, bootstrapContext, applicationArguments);
       // 배너 출력
       Banner printedBanner = printBanner(environment);
       // ApplicationContext 준비
       context = createApplicationContext();
       context.setApplicationStartup(this.applicationStartup);
       prepareContext(bootstrapContext, context, environment,
                      listeners, applicationArguments, printedBanner);
       // ApplicationContext refresh
       refreshContext(context);
       // refresh 이후 처리 작업
       afterRefresh(context, applicationArguments);
       // 시작 시간 계산 및 로깅
       startup.started();
       if (this.logStartupInfo) {
          new StartupInfoLogger(this.mainApplicationClass)
                .logStarted(getApplicationLog(), startup);
       }
       // 시작 완료 이벤트 발생
       listeners.started(context, startup.timeTakenToStarted());
       // ApplicationRunner와 CommandLineRunner 실행
       callRunners(context, applicationArguments);
    }
    catch (Throwable ex) {
       if (ex instanceof AbandonedRunException) {
          throw ex;
       }
       handleRunFailure(context, ex, listeners);
       throw new IllegalStateException(ex);
    }
    // 준비완료 이벤트 발생
    try {
       if (context.isRunning()) {
          listeners.ready(context, startup.ready());
       }
    }
    catch (Throwable ex) {
       if (ex instanceof AbandonedRunException) {
          throw ex;
       }
       handleRunFailure(context, ex, null);
       throw new IllegalStateException(ex);
    }
    return context;
}1단계: Startup 객체 생성
Startup startup = Startup.create();시작 시간을 추적하기 위한 Startup 객체를 생성한다. 이는 Spring Boot 3.X에서 도입된 새로운 시간 추적 메카니즘을 사용한다.
2단계: 셧다운 훅 설정
if (this.registerShutdownHook) {
   SpringApplication.shutdownHook.enableShutdownHookAddition();
}애플리케이션 종료 시 정리 작업을 수행할 셧다운 훅을 활성화 한다. setRegisterShutdownHook(false) 호출로 비활성화 할 수 있다. registerShutdownHook이 true인 경우(디폴트 true) 생성된 ApplicationContext에 종료 훅이 등록된다. JVM 종료가 원활하게 처리되도록 기본값은 true로 설정된다.
3단계: BootstrapContext 생성
DefaultBootstrapContext bootstrapContext = createBootstrapContext();ApplicationContext가 생성되기 전까지 필요한 서비스들을 제공하는 Bootstrap Context를 생성한다.
BootstrapContext는 ApplicationContext가 생성되기 전 단계에서 필요한 서비스들을 제공하는 임시 컨테이너 역할을 한다.
BootstrapContext가 필요한 이유는 다음과 같다.
- ApplicationContext 생성에는 시간이 걸림(Bean 스캔, 자동 구성등)
- 하지만 ApplicationContext 생성 과정에서도 일부 서비스가 필요함
- 예: 환경 설정 로딩, 외부 구성 서버 연결, 보안 설정등
BootstrapContext vs ApplicationContext
| 특성 | BootstrapContext | ApplicationContext |
| 생성 시점 | 애플리케이션 시작 직후 | 부트스트랩 과정 중반 |
| 생명 주기 | 짧음(ApplicationContext 생성 후 소멸) | 애플리케이션 전체 |
| 용도 | 초기설정, 외부 서비스 연결 | 모든 Bean 관리 |
| 서비스 수 | 적음 (필수적인 것만) | 많음 (전체 애플리케이션) |
| 의존성 주입 | 수동 등록 | 자동 주입 |
닭과 달걀 문제 해결
부트스트래핑에서 과정에서 가장 흥미로운 요소 중 하나가 바로 BootstrapContext이다.
ApplicationContext를 만들기 위해서는 설정(Configuration)이 필요하다. 하지만 설정을 가져오기 위해서 외부 서비스(예: Spring Cloud Config)에 연결하려면 또 다른 객체가 필요하다. 이러한 순환 의존성을 끊기 위해 Spring Boot는 BootstrapContext 장치를 마련했고 이는 ApplicationContext 생성에 필요한 최소한의 서비스들을 미리 준비해두는 역할을 한다.
4단계: 헤드리스 모드 설정
configureHeadlessProperty();GUI가 없는 서버 환경에서 실행됨을 시스템에 알리는 역할을 한다. 이 메서드는 내부적으로 java.awt.headless 시스템 프로퍼티를 true로 설정한다.
5단계: SpringApplicationRunListeners 획득 및 시작 이벤트 발행
SpringApplicationRunListeners listeners = getRunListeners(args);
listeners.starting(bootstrapContext, this.mainApplicationClass);애플리케이션 시작 과정을 모니터링할 리스너들을 가져오고, ApplicationStartingEvent를 발행한다.
6단계: ApplicationArguments 생성 및 Environment 준비
ApplicationArguments applicationArguments = new DefaultApplicationArguments(args);
ConfigurableEnvironment environment =
prepareEnvironment(listeners, bootstrapContext, applicationArguments);명령행 인수를 처리하고 Environment 객체를 준비한다.
이 단계에서는 다음 작업들이 수행된다.
Environment 객체 생성
- 웹 애플리케이션 타입에 따라 적절한 Environment 구현체 생성
- StandardServletEnvironment, StandardReactiveWebEnvironment 등
프로퍼티 소스 구성
- application.properties/yml 파일 로드
- 환경변수, 시스템 프로퍼티, 명령행 인수 등을 우선순위에 따라 구성
Environment 준비 완료 이벤트 발행
listeners.environmentPrepared(bootstrapContext, environment);위 코드는 내부적으로 EventPublishingRunListener 클래스의 environmentPrepared 메서드를 호출하는데 해당 메서드는 다음과 같다.
@Override
	public void environmentPrepared(ConfigurableBootstrapContext bootstrapContext,
			ConfigurableEnvironment environment) {
		multicastInitialEvent(
				new ApplicationEnvironmentPreparedEvent(bootstrapContext, this.application, this.args, environment));
}위 코드는 SpringApplication 인스턴스에 등록된 이벤트 리스너들에게 ApplicationEnvironmentPreparedEvent를 전달하는 역할을 한다. 이 시점은 실제 Spring Bean들이 생성되기 전이므로 이 이벤트를 구독하는 리스너들은 다음과 같은 초기화 작업을 수행한다.
- 프로파일(Profiles) 설정: spring.profiles.active 설정을 확인하여 어떤 환경(dev, local, prod등)으로 구동할지 결정한다.
- 후처리 작업: 특정 환경 변수에 따라 시스템 속성을 동적으로 변경해야 할 때 이 시점을 활용한다.
또한 ApplicationListener<ApplicationEnvironmentPreparedEvent>를 구현한 커스텀 리스너를 등록하여 환경 설정이 완료된 후에 원하는 작업을 처리할 수 있다.
7단계: Banner 출력
Banner printedBanner = printBanner(environment);Spring Boot의 시작 배너를 콘솔에 출력한다. spring.main.banner-mode로 제어가 가능하다.
8단계: ApplicationContext 생성
context = createApplicationContext();
context.setApplicationStartup(this.applicationStartup);웹 애플리케이션 타입에 따라 적절한 ApplicationContext 구현체를 생성하고 ApplicationStartup 객체를 생성한다.
| 애플리케이션 타입 | ApplicationContext 구현체 | 특징 |
| SERVLET | AnnotationConfigServletWebServerApplicationContext | 톰캣 내장 서블릿 서버 관리 |
| REACTIVE | AnnotationConfigReactiveWebServerApplicationContext | 네티 기반 리액티브 서버 및 비동기 처리 |
| NONE | AnnotationConfigApplicationContext | 웹 서버 없는 경량 구조 |
SERVLET 타입의 경우 컨텍스트의 onRefresh() 단계에서 createWebServer()를 호출하여 내장 톰캣 서버를 실제 기동한다.
9단계: ApplicationContext 준비
prepareContext(bootstrapContext, context, environment, listeners, applicationArguments, printedBanner);ApplicationContext를 초기화하고 Bean 정의를 등록한다. (Bean을 등록하는 것이 아닌 Bean 생성을 위한 정의를 로드하는 것이다)
이 단계에서는 핵심적인 여러 단계를 포함한다.
다음은 prepareContext() 내에서 실행되는 동작들이다.
ApplicationContext에 Environment 주입
context.setEnvironment(environment);ApplicationContextInitializer 실행
applyInitializers(context);사용자 정의 ApplicationContextInitializer를 추가했다면 이 단계에서 사용자 정의 ApplicationContextInitializer가 실행된다.
컨텍스트 준비 완료 이벤트 발행
listeners.contextPrepared(context);SpringApplication 인스턴스에 등록된 리스너들에게 ApplicationContextInitializedEvent를 전달한다.
BootstrapContext 종료
bootstrapContext.close(context);컨텍스트 로드 완료 이벤트 발행
listeners.contextLoaded(context);SpringApplication 인스턴스에 등록되어 있던 리스너들 중에서 ApplicationContextAware 인터페이스를 구현한 리스너를 찾아서 방금 로드된 ApplicationContext 객체를 전달하고 ApplicationPreparedEvent를 발행한다. 이 이벤트는 Bean이 실제로 생성되기 전에 마지막으로 설정을 조작해야 할 기능들이 수신한다.
ApplicationListener<ApplicationPreparedEvent> 인터페이스를 구현한 사용자 정의 구현체를 SpringApplication 인스턴스의 addListener를 통해서 등록하여 ApplicationPreparedEvent를 받아서 처리할 수 있다.
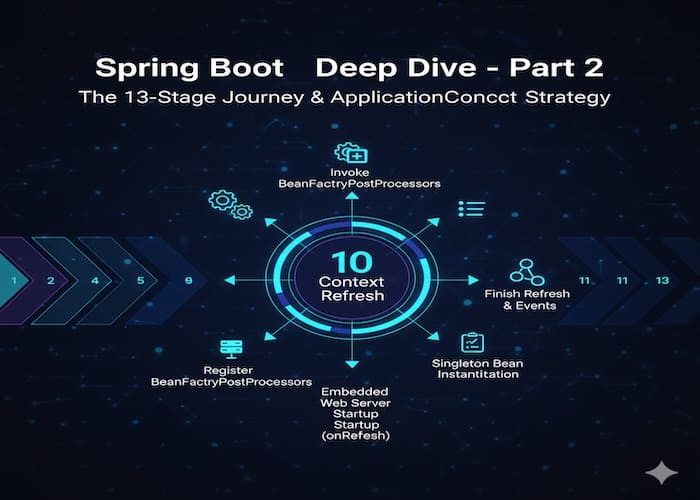
10단계: ApplicationContext refresh
이 단계에서 드디어 Bean을 생성하고 의존성을 주입하며 웹 서버를 시작한다.
refreshContext(context);이 단계가 Spring Boot 애플리케이션 기동 과정에서 가장 핵심적인 단계라고 할 수 있다.
- BeanFactory 준비 및 PostProcessor 실행
- ApplicationContext 내부의 BeanFactory를 준비한다.
- @Configuration 클래스를 분석하여 어떤 Bean들을 생성해야 할지 최종 결정한다.
- PropertySourcesPlaceholderConfigurer 같은 프로세서가 동작하여 Bean 설정에 포함된 ${…} 값들을 실제 환경 변수로 치환한다.
- Bean 후처리기 등록 (registerBeanPostProcessors)
- Bean이 생성되기 전과 후에 개입하여 프록시 객체를 만들거나(AOP) 추가 설정을 처리할 BeanPostProcessor들을 먼저 생성하여 등록한다.
- BeanPostProcessors 인터페이스에 대한 사용자 정의 구현체 클래스를 만들어서 특정 Bean에 대한 특정 처리를 하거나 AOP를 적용한 새로운 Bean을 등록할 수도 있다.
- 내장 웹서버 기동 (onRefresh)
- 웹 애플리케이션(SERVLET, REACTIVE) 타입인 경우 Tomcat, Jetty, Netty와 같은 내장 웹 서버를 기동한다.
- 모든 싱글톤 Bean의 인스턴스화
- 가장 많은 시간이 소요되는 구간이다.
- 정의된 모든 싱글톤 Bean을 실제 메모리에 로드한다. (Instantiation)
- Bean들 사이의 의존성 주입이 이루어진다.
- SpringApplication 인스턴스에서 LazyInitialization 속성이 false(기본값)이면 모든 Bean이 이 단계에서 즉시 생성된다.
- refresh 완료 및 이벤트 발행
- ContextRefreshedEvent를 발행하여 ApplicationContext가 완전히 가동 되었음을 알린다.
BeanPostProcessor 인터페이스
BeanPostProcessor 인터페이스는 두가지 핵심 메서드를 제공한다.
postProcessBeforeInitialization: 빈 객체가 생성되고 의존성 주입이 완료된 후 @PostConstruct나 afterPropertiesSet이 호출되기 직전에 실행된다.
postProcessAfterInitialization: 초기화 메서드(@PostConstruct등)가 실행된 직후에 실행된다. 주로 프록시 객체로 감싸거나(AOP) 최종 검증을 할 때 사용한다.
11단계: 시작시간 계산 및 로깅
Duration timeTakenToStartup = Duration.ofNanos(System.nanoTime() - startTime);
if (this.logStartupInfo) {
    new StartupInfoLogger(this.mainApplicationClass).logStarted(getApplicationLog(), timeTakenToStartup);
}애플리케이션 시작 시간을 계산하고 로그에 기록한다.
12단계: ApplicationRunner와 CommandLineRunner 실행
callRunners(context, applicationArguments);ApplicationRunner와 CommandLineRunner 인터페이스를 구현한 Bean들을 찾아 실행한다.
13단계: 준비 완료 이벤트 발행
if (context.isRunning()) {
    Duration timeTakenToReady = Duration.ofNanos(System.nanoTime() - startTime);
    listeners.ready(context, timeTakenToReady);
}ApplicationReadyEvent를 발행하여 애플리케이션이 완전히 준비되었음을 알린다.
애플리케이션 부트스트랩 과정에서 이벤트 처리 샘플
애플리케이션 부트스트랩 과정에서 사용자 정의 BootstrapInitializer를 등록하고 BootstrapContext에 클래스를 등록하여 EnvironmentPreparedEvent를 처리하는 사용자 정의 리스너를 구현하여 BootstrapContext에 등록된 값을 Environment에 추가하고 ApplicationContext 생성 직후에 실행되는 ApplicationContextInitializer를 등록하여 Environment의 값을 로그에 기록하는 샘플 코드다.
BootstrapInitializer(cpu core 개수 체크)
--> BootstrapContext에 CPU-CORE-<cpu core 개수> 문자열 등록
--> EnvironmentPreparedEvent 리스너에서 CPU-CORE-<cpu core 개수> 값을 Environment에 추가
--> ApplicationContextInitializer에서 Environment로 부터 등록된 CPU-CORE-<cpu core 개수> 값을 로깅BootstrapInitializerCustom.java
@Slf4j
public class BootstrapInitializerCustom implements BootstrapRegistryInitializer {
/*
이 애플리케이션은 cpu core수가 최소 3개 이상이 필요하다.
BootstrapInitializer에서 ApplicationContext가 생성되기 전에 cpu core수를 미리 확인한다.
cpu core수를 충족하지 못하면 애플리케이션을 종료하고 충족하면 BootstrapContext에 CPU-CORE-X를 등록한다.
후에 BootstrapContext에서 CPU-CORE-X 값을 가져와서 Environment에 등록하고 ApplicationContext에서 이 값을 읽을 것이다.
*/
    @Override
    public void initialize( BootstrapRegistry registry ) {
        log.info( "<<< BootstrapInitializerCustom::initialize start." );
        int coreCnt = Runtime.getRuntime().availableProcessors();
        if ( coreCnt <= 2 ) {
            log.error( "<<< BootstrapInitializerCustom::initialize failed, cpu core must be > 2" );
            throw new RuntimeException( "BootstrapInitializerCustom initialize failed, cpu core must be > 2" );
        }

        log.info(  "<<< BootstrapInitializerCustom::initialize complete." );
        // BootstrapRegistry에 String 타입의 CPU-CORE-X
        registry.register( String.class, context -> new String("CPU-CORE-" + coreCnt) );

    }
}BootstrapRegistryInitializer 인터페이스를 구현한 구현체다. ApplicationContext가 생성되기도 전인 아주 초기에 실행된다. cpu core 개수를 가져와서 2개 이하인 경우 애플리케이션을 종료한다. 즉, 이 애플리케이션의 구동 조건은 cpu core 개수가 최소 3개 이상이어야 한다는 것을 의미한다.
cpu core 개수가 만족된다면 BootstrapContext에 “CPU-CORE-<core 개수>” 값을 등록한다.
ApplicationListenerCustom.java
@Slf4j
public class ApplicationListenerCustom implements ApplicationListener<ApplicationEnvironmentPreparedEvent> {
/*
Environment 준비가 끝난 뒤에 발생하는 이벤트를 후킹하여 Environment에 BootstrapContext에 등록된 CPU-CORE-X 값을 Environment에 추가한다.
Environment에 추가된 값을 ApplicationContext가 생성된 직후 후킹 클래스에서 꺼내와 로그를 찍을 예정이다.
*/
    @Override
    public void onApplicationEvent( ApplicationEnvironmentPreparedEvent event ) {
        ConfigurableBootstrapContext bootstrapContext = event.getBootstrapContext();
        String cpuCoreInfo = bootstrapContext.get( String.class );
        log.info( "<<< ApplicationListenerCustom::get cpu core string from bootstrap context: {}", cpuCoreInfo );
        Map<String, Object> map = new HashMap<>();
        map.put( "app.system.cpu.core", cpuCoreInfo );
        event.getEnvironment().getPropertySources().addFirst( new MapPropertySource( "bootstrapProp", map ) );
        log.info( "<<< ApplicationListenerCustom::add property source to Environment: {}", map );
    }
}Environment 환경 구성이 완료된 이후 발행되는 ApplicationEnvironmentPreparedEvent를 처리하는 이벤트 리스너를 정의했다. ApplicationEnvironmentPreparedEvent에는 BootstrapContext 객체가 포함되어 있기 때문에 BootstrapContext로부터 CPU-CORE-<core 개수> 값을 얻을 수 있다.
BootstrapContext로부터 얻은 값을 Environment에 ‘bootstrapProp’라는 이름으로 PropertySource를 추가한다.
ApplicationContextInitializerCustom.java
@Slf4j
public class ApplicationContextInitializerCustom implements ApplicationContextInitializer<ConfigurableApplicationContext> {
    /*
    ApplicationListenerCustom에서 추가한 Environment에서 'bootstrapProp' 프로퍼티 소스에서 추가한 값을 가져와서 출력한다.
     */
    @Override
    public void initialize( ConfigurableApplicationContext applicationContext ) {
        ConfigurableEnvironment environment = applicationContext.getEnvironment();
        PropertySource<?> bootstrapProp = environment.getPropertySources().get( "bootstrapProp" );
        Object cpuCoreProperty = bootstrapProp.getProperty( "app.system.cpu.core" );
        if (  cpuCoreProperty != null ) {
            log.info( "<<< ApplicationContextInitializerCustom::cpu core property from bootstrap context: {}", cpuCoreProperty );
        }
    }
}ApplicationContextInitializer<ConfigurableApplicationContext>를 구현한 사용자 정의 구현체다. ApplicationContext가 생성된 바로 직후에 실행된다.
ApplicationContext에 있는 Environment로부터 ApplicationListenerCustom.java에서 추가했던 ‘bootstrapProp’ 이름의 PropertySource를 가져와서 CPU-CORE-<core 개수> 정보를 얻는다.
SpringApplication에 BootstrapInitializer, ApplicationListener, ApplicationContextInitializer를 추가 등록한다.
@SpringBootApplication
public class SpringBootBootstrapApplication {

    public static void main( String[] args ) {
        SpringApplication springApplication =
                new SpringApplication( SpringBootBootstrapApplication.class );
        springApplication.addBootstrapRegistryInitializer( new BootstrapInitializerCustom() );
        springApplication.addListeners( new ApplicationListenerCustom() );
        springApplication.addInitializers( new ApplicationContextInitializerCustom() );
        springApplication.run( args );
    }
}BootstrapInitializerCustom, ApplicationListenerCustom, ApplicationContextInitializerCustom을 META-INF/spring.factories에 등록하거나 위와 같이 코드 상으로 추가 등록할 수 있다.
실행 결과 로그는 다음과 같다. (편의상 로그 라인 상의 앞 부분은 보기좋게 짤랐다.)
BootstrapInitializerCustom -- <<< BootstrapInitializerCustom::initialize start.
BootstrapInitializerCustom -- <<< BootstrapInitializerCustom::initialize complete.
ApplicationListenerCustom      : <<< ApplicationListenerCustom::get cpu core string from bootstrap context: CPU-CORE-10
ApplicationListenerCustom      : <<< ApplicationListenerCustom::add property source to Environment: {app.system.cpu.core=CPU-CORE-10}

  .   ____          _            __ _ _
 /\\ / ___'_ __ _ _(_)_ __  __ _ \ \ \ \
( ( )\___ | '_ | '_| | '_ \/ _` | \ \ \ \
 \\/  ___)| |_)| | | | | || (_| |  ) ) ) )
  '  |____| .__|_| |_|_| |_\__, | / / / /
 =========|_|==============|___/=/_/_/_/

 :: Spring Boot ::                (v4.0.1)

ApplicationContextInitializerCustom : <<< ApplicationContextInitializerCustom::cpu core property from bootstrap context: CPU-CORE-10단계 별로 실행 흐름을 보면 다음과 같다.
배너 출력 이전에 BootstrapInitializerCustom이 가장 먼저 실행되었다. (3단계 – BootstrapContext 생성)
이후 Environment 객체 생성이 완료된 후에 ApplicationListenerCustom이 실행되었다. (6단계 – Environment 준비)
배너가 출력되었다. (7단계 – 배너 출력)
이후 ApplicationContextInitializerCustom이 실행되었다. (9단계 – ApplicationContext 준비 단계)
이와 같이 애플리케이션 부트스트랩 과정의 흐름을 알면 부트스트랩 과정에서 처리해야 하는 작업이 있을 때 유연하게 대처할 수 있을 것 같다.
Spring Boot 부트스트랩 과정은 단순히 객체를 만드는 과정이 아니라 매우 철저하게 계산된 순서에 따라 환경을 구축해가는 과정이다. 이 13단계를 이해하면 애플리케이션 시작 성능을 튜닝하거나 구동시 발생하는 에러를 훨씬 쉽게 디버깅 할 수 있다.
먼저 보면 좋은 포스팅
Spring Boot 시작 – SpringApplication 생성과 자동 감지
다음에 보면 좋은 포스팅
Spring Boot – Bean Initialization과 Event System